Onboarding New GCP Users — Model Developers
Introduction
GCP is our bank’s Global Risk Management toolkit, designed to speed up Python development. This includes the simplification of querying any database that business supports across the banking division and investment division. Throughout this document, development and developers refer to the team that has designed and maintains this product, and makes it available to other “customer” departments. Model developers are the Python programmers or developers that will be using this documentation to get started and to create customized risk analysis solutions for their teams.
This document explains how a workflow is created, defines the most important classes and nodes, and provides exercises that will help you set up your environment. Each exercise builds on the previous one — and each iteration expands the complexity of your challenges.
Setting Up
The following instructions concisely summarize how to set up your environment.
If you are new to our bank, you may find these instructions too brief. Consult your department’s Confluence and Wiki documentation for business process constraints or procedures that are unique to your department. This section covers:
Getting the Right Software
Installing Python, PyCharm, and Git (includes Git Bash) is a straightforward process. Visit the myTechnology website and request each of these tools. After about half a day, you will receive an automated email notifying you that the PAM system has delivered these applications to your desktop. Launch them to confirm they have been installed properly. If you have any issues running them, submit an L1 ticket via the ServiceNow portal link provided in your department’s “Welcome Packet: Onboarding Guide.”
To install PyCharm Community Edition, visit myTechnology.
When requesting PyCharm or any other tools mentioned in this document, select the most recent, free version.
Refer to the next section, which primarily focuses on adding a security key into BitBucket.
Important: You will not be able to pull repositories from the GCP Bitbucket project without proper security key setup.
Installing Python and Git
To install Python (current recommended version is 3.9), go to Python x64 3.9.20 and click Request Now.
If your department blocks this operation, submit a ticket via myTechnology python-3920.
For EA Request ID, select Not Required from the pull-down menu.
When done, click Submit request. You will be notified via email when it has been installed to your endpoint (laptop, device, or virtual machine).
To install Git, there are a few additional steps because Git must pass BitBucket security, requiring the .gitconfig file to be set up. Specifically, you need to:
Each will be explained below.
1. Install Git Using the myTechnology Website
Go to the myTechnology website and search for Git.
Click the Request Now button next to the latest version (Example: Git 2.46.1).
Fill out the required request information and click Submit request.
Wait for an email informing you that Git has been successfully installed on your device.
2. Set up Basic Git Bash Properties
After you are notified that Git has been installed, follow these steps:
Click Start and search for Git.
When the Git Bash icon appears, right-click and select Pin to Start.
Launch Git Bash.
To open your
.gitconfigfile for editing, run the following command:git config --global --edit
In vscode or a text editor, e.g., vi, or Notepad++, update your e-mail and name. Make sure that this email address is the one being used by BitBucket, because this becomes important for the next section. Example:
[user]
    name = Doe, Jon
    email = jon.doe@bofoz.com
Tip: If a
.gitconfigfile does not exist, Git Bash will automatically create it when you run the edit command.
3. Set Up Bitbucket SSO
In this step, you will set up an ed25519 key and integrate it with your Bitbucket account. ED25519 is equivalent to RSA-3072 in that it provides 128-bit security, and it is commonly used in PGP and TLS. It is practical even for IoT solutions because it is fast and efficient on low-powered devices.
To set up Bitbucket:
Check for an existing SSH key by entering the following command in your Git Bash root.
The directory found when the Git Bash session is invoked:
# The public SSH key used by Bitbucket is found in id_ed25519.pub
# If you have this file, you have already completed this section on preparing Python and Git

ls -al ~/.ssh

# If you receive the error: ‘ls: cannot access /c/.ssh: No such file or directory’
# You can resolve it by creating an .ssh directory in your home directory.
# It should path to C:/Users/<your Standard ID>/.ssh

mkdir ${HOME}/.ssh
Screenshot: Output result
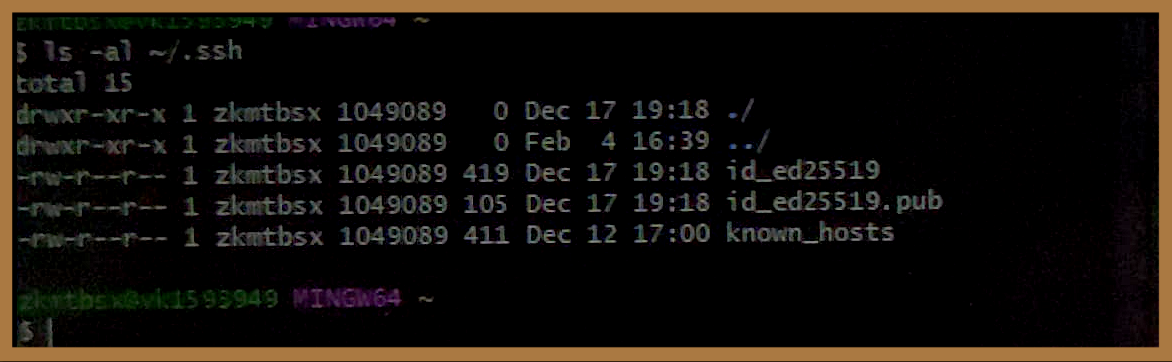
Tip: If you already have
id_ed25519andid_ed25519.pubbut wish to generate a new key, delete these files and continue to the next step to create a new SSH key. If you believe Bitbucket is already set up and wish to test it, jump to Step 7 of this section.If you cannot run the
lscommand, make sure it exists and is pathed correctly.
Troubleshooting Examples:# Returns the ls.exe path (typically found in /usr/bin/ or /Program Files/git/usr/bin/): which ls # Provides multiple locations, including binary, source, and manual pages: whereis ls # To test if it is in a valid path: echo $PATH
Generate a new SSH key by creating
id_ed25519andid_ed25519.pubwithgit config. In Git Bash, run the following commands, replacing the placeholder values with your actual name and email. Do not enter a passphrase.Example:
git config --global user.name "Last, First"
git config --global user.email your_email@BofOz.com

# Generate a new SSH key
ssh-keygen -t ed25519 -C your_email@BofOz.com

# When prompted to enter a file name for saving your new key, press <Enter> to accept the default location.
# Do NOT enter a passphrase.
Retrieve and verify your SSH key. To get the content of the
id_ed25519.pubfile, use thecatandclipcommands in Git Bash (you will need this soon for Bitbucket).Examples:
# Displays the SSH public key you will copy:
cat ~/.ssh/id_ed25519.pub

# Copies your SSH key directly to the clipboard for Bitbucket setup:
clip < ~/.ssh/id_ed25519.pub

# SAMPLE OUTPUT that is getting copied — and will soon be pasted into Bitbucket:
# ssh-ed25519 AAAAD5TazC1lZDI1NTRESANT5AAIHYB5noPbdR4VrRivFjfJ9LjubavRIJ3KAof jon.doe@BofOz.com

# MS-DOS CMD alternative (Windows Command Prompt):
cd %userprofile%/.ssh
clip < id_ed25519.pub

# MacOS Terminal (zsh) alternative:
# pbcopy < ~/.ssh/id_ed25519.pub
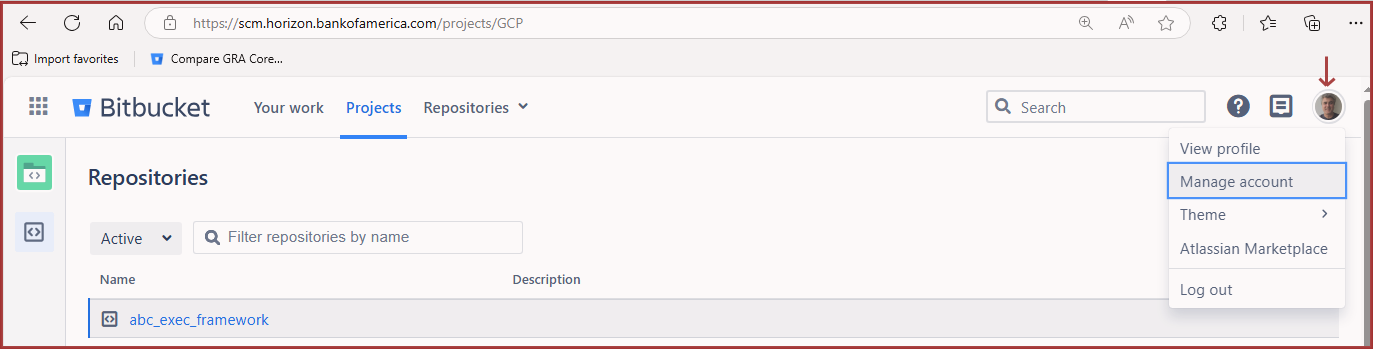
Log into your Bitbucket account.
After entering Bitbucket, click on your Profile (top right) and select Manage account.Screenshot: Finding Bitbucket’s Manage Account settings
Paste the contents of your
id_ed25519.pubfile into Bitbucket:Select SSH keys from the left menu.
Click Add key.
Paste your unique SSH key into the Key text field.
Optionally, enter a label in the Key label field for traceability.
Click Save to complete your Bitbucket setup.
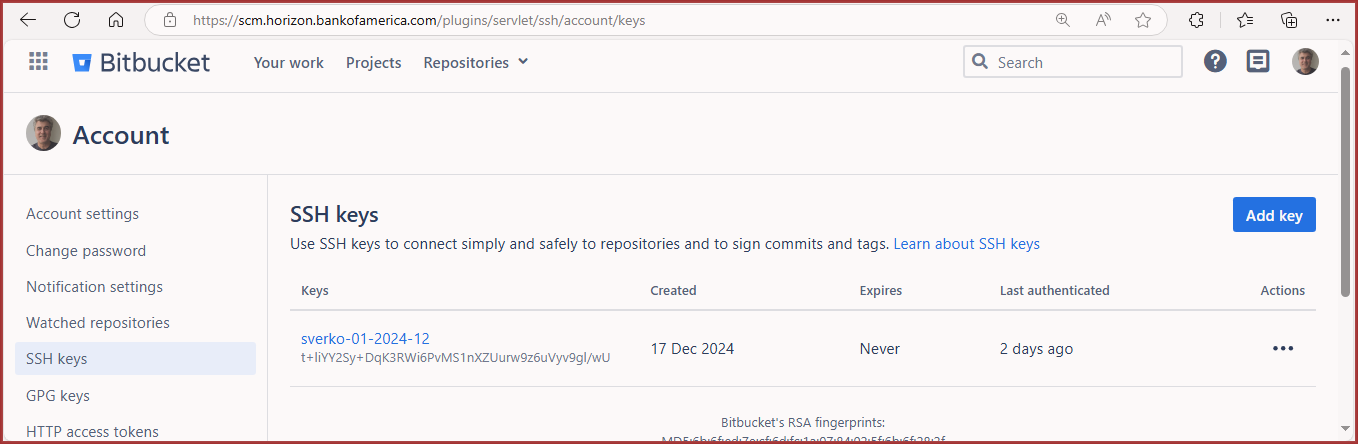
After saving, you can view your SSH key:
Go to Profile > Manage account > SSH keys.
Screenshot: Viewing all Bitbucket keys
7. Test your SSH connection to Bitbucket.
- Open **Git Bash** or your terminal.
- Run the following command to verify that your SSH key is correctly configured:
```python
ssh -T git@scm.horizon.bankofoz.com
```
- If the connection is successful, you will see a welcome message indicating successful authentication.
- If you receive a permission error, review your SSH key setup before continuing.

> **Tip:** Testing your SSH connection early saves time troubleshooting later.
Confirm that your key works by cloning a test repository.
Click on Projects in the main Bitbucket ribbon.
In Search (Filter projects by name), enter GRA.
In the filter results, click on GRA Core Platform.
In Search (Filter repositories by name), enter play.
In the filter results, click on playground.
In Bitbucket’s left-panel ribbon, click Clone and copy the code.
Screenshot: The Bitbucket Clone Button
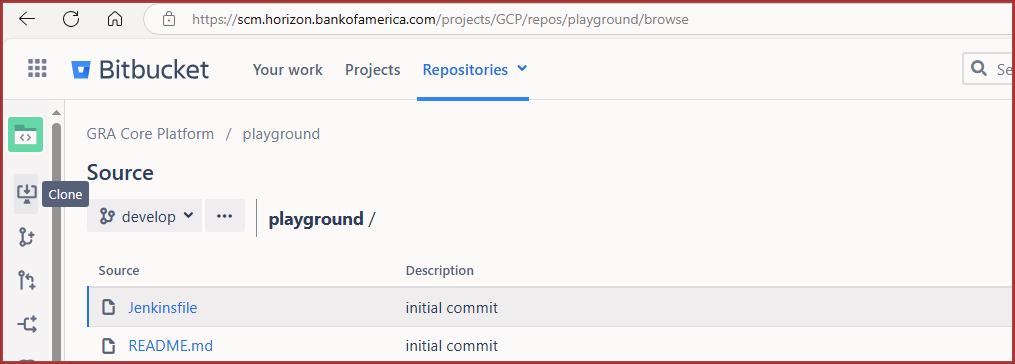
In the dialog box that appears, click the Click to copy button.
In Git Bash, PowerShell, or Command Prompt (cmd), navigate to the directory where you want to clone the repository, then run the
git clonecommand using the copied text.
Example:
git clone ssh://git@scm.horizon.bankofoz.com/gcp/playground.git

# If the following results are returned, your Bitbucket setup is correct:
Cloning into 'playground'...
remote: Enumerating objects: 4, done.
remote: Counting objects: 100% (4/4), done.
remote: Compressing objects: 100% (4/4), done.
remote: Total 4 (delta 0), reused 1 (delta 0), pack-reused 0
Receiving objects: 100% (4/4), done.

# When done, you can DELETE the playground folder you just cloned.
# You will not be using it right now.
If you were not able to complete the above steps successfully, see Getting the Right Permissions to resolve any authorization issues.
Getting the Right Permissions
To access GCP repositories, GCP packages, and relevant databases, you will need permissions granted through ARM. This section briefly describes the processes for requesting permissions as a Model Developer, specifically related to GCP tools.
Setting Up a Development Environment on Your PC
This section focuses on setting up Artifactory access and creating your virtual environment (venv).
Referencing an external packaging repository (such as pip’s default ‘simple’ index at https://pypi.org/simple/) is not permitted by most banking and financial institutions. Therefore, before you can establish a local Python learning environment or sandbox, your pip configuration must be registered with Artifactory to access an internal index.
Once you complete this setup, you can create your Python virtual environment (venv). You will then be able to activate your tools in this virtual environment and interact with GCP, as you write your own workflows.
Steps covered in this section:
1. Log in to Oz’s Artifactory
Bank of Oz uses a JFrog Artifactory instance to internally store and maintain resources needed by developers. To complete this section, log in to the JFrog intranet site using your Standard ID credentials.
Tip: If this is your first time using Artifactory as a Bank of Oz employee, you may be prompted to enter your password into the Current Password field and click Unlock.
Keep this tab open in your browser, because you will return to it in Step 3.
2. Choose Location and Prepare pip.ini File
Determine where you would like to place the pip.ini file you will be building.
Example:
# From Bash, the pip command displays all the locations it checks for an initialization file
pip config -v list

# -------------------------- Sample Output -------------------------
# For variant 'global', will try loading 'C:\ProgramData\pip\pip.ini'
# For variant 'user', will try loading 'C:\Users\zkmtbsx\pip\pip.ini'
# For variant 'user', will try loading 'C:\Users\zkmtbsx\AppData\Roaming\pip\pip.ini'
# For variant 'site', will try loading 'C:\dev\gcp_py_samples\venv\pip.ini'
In one of these folders, create a pip.ini file, e.g., C:\ProgramData\pip\pip.ini, and paste the following content into your new .ini text file:
[global]

cert = /etc/pki/ca-trust/extracted/pem/tls-ca-bundle.pem
index-url = https://$USER:$API_KEY@artifacts.horizon.bankofoz.com/artifactory/api/pypi/virtual-pypi/simple
trusted-host = artifacts.horizon.bankofoz.com   pypi-python.org

extra-index-url = http://$USER:$API_KEY@artifacts.horizon.bankofoz.com/artifactory/api/pypi/libs-snapshot-local-pypi/simple

[search]
index = https://$USER:$API_KEY@artifacts.horizon.bankofoz.com  pypi.python.org

[list]
format = columns

[distutils]
index-servers = local

[local]
repository = https://$USER:$API_KEY@artifacts.horizon.bankofoz.com/artifactory/api/pypi/libs-snapshots-local-pypi
Finally, replace each $USER with your <Standard ID> (e.g., zyxwvut) and save the pip.ini file.
Important: You must replace “$USER” in four places, and your
<Standard ID>must be entered in lowercase form.
3. Generate Python Packager Key, Update pip.ini, and Activate venv
When working with GCP for the first time, it is best to complete these twelve (12) steps in one sitting — from start to finish.
Tip: Once your GCP environment is prepared, you may need to refer back to these steps from time to time. Whenever you start a new GCP project, revisit Step 11 and review the project package’s README file.
With your pip.ini still open:
Return to your Artifactory tab.
Log in with your Standard ID credentials.
In the User Profile screen, enter your Standard ID password under To edit your user profile, please enter your password.
Click Unlock.
Click Generate an Identity Token.
In the Generate an Identity Token dialog box, provide a meaningful description in the Add Description field (e.g., a purpose and today’s date).
Click Next.
Copy your generated Reference Token by clicking on the Copy ‘Generated token’ to clipboard button.
Return to your
pip.inifile and replace each instance of$API_KEYwith your unique token (four places).Save and close your
pip.inifile.Run the following commands to create your virtual environment and test setup:
# Bash commands to install Python packages
# Assumes you have created the following location:
# /c/gcp_sandbox/modelproject01/

cd /c/gcp_sandbox/modelproject01/
mkdir -p venvs
cd venvs
python -m venv venv
cd venv/Scripts
source ./activate
python -m pip install --upgrade pip
python -m pip install scipy
Tip: If the
sourceandpythoncommands run without error, your Artifactory setup was successful.
Additional Identity Token Characteristics
If you make a mistake, you cannot reuse the same token; however, you can generate a new token by repeating steps 5 through 8.
Tokens cannot be deleted, so it is important to name them in a meaningful way.
Tokens expire after one year.
4. Troubleshooting Tips for this Section
If you have run source ./activate and later closed your terminal session, your session has been deactivated. You will need to reactivate it before continuing.
Other common pip.ini issues:
You accidentally copied incorrect information from Artifactory to
pip.ini.An incorrect
pip.inifile is being used or the one you built is not in the correct path. Run the following to verify:echo $(realpath "pip.ini")
Then review the previous instructions.
Your Standard ID was incorrectly entered into
pip.ini(it must be in lowercase).You forgot to replace all four instances of
$API_KEYwith your generated token.
Writing GCP Workflows
It is vital to understand that GCP is built for workflows designed to process large quantities of data. Be patient with the exercises that present the anatomy of a GCP workflow — they are intentionally designed to ensure that no node in a workflow is busy collecting data unnecessarily.
To illustrate this, consider that most real-world projects will typically fall into one of these GCP kernel data-processing scenarios:
Node not executed previously, external data required, and node is available
Node not executed previously, external data required, but dataset not registered
Node has previously been executed
For more about nodes, see the Nodes section in the API.
If you want to run GCP and create a basic workflow, you do not need to deep dive into nodes or syntax yet (this can come later). Follow the instructions below to get started. If you encounter an impossible impasse, you can email GCP support.
How to Create Your First GCP Workflow
This section walks you through:
Downloading a repository
Configuring your Python virtual environment with the correct tools and libraries
Executing a simple workflow to add two variables (a+b)
Exiting the virtual environment gracefully so that you do not accidentally leave it open when switching to a different project with unique requirements
To run your first workflow successfully, complete the following high-level steps:
1. Prepare GCP and Install Test Environment
You should have already installed the recommended Python version that includes Spark integration. See Installing Python and Git if needed.
Since you will be running GCP in a virtual environment (venv), you are not actually installing GCP. Instead, you will copy a folder from the GRA GCP repository that contains workflow examples. The final steps of this section will focus on setting up your venv.
Important: If you have not set up your SSH key to secure data traveling to and from Bitbucket repositories, complete Set up Bitbucket SSO first.
To prepare your GCP repository:
Open
bashor a similar Unix shell and create a folder for GCP.
Example:
~/c/gcp_sandbox/modelproject01/
Important: For faster performance, run your projects from the
C:drive rather than theH:drive, especially when working in a virtual environment.
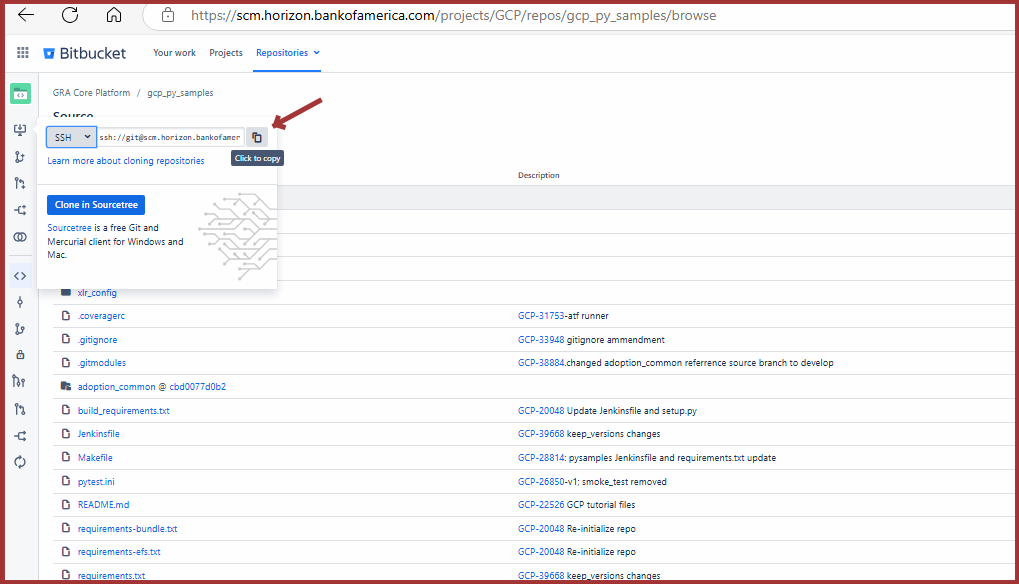
Select your preferred repository with sample workflows in Bitbucket’s GCP project directory here.
Troubleshoot: If you cannot see the GCP repos, or if you receive an HTTPS port 443 error, you may lack Bitbucket access. See Getting the Right Permissions.
With the repository selected (gcp_py_samples), click the Clone button on the left panel and copy the clone command.
Example:
ssh://git@scm.horizon.bankofoz.com/gcp/gcp_py_samples.git
Screenshot: Clone gcp_py_samples for A+B Workflow
Return to your shell (
bash) and run thegit clonecommand with the copied SSH string. Then enter that folder.
Example:
cd /c/gcp_sandbox/modelproject01/
git clone ssh://git@scm.horizon.bankofoz.com/gcp/gcp_py_samples.git
Display the directory’s contents and confirm cloning. Then
cdinto the local copy of the repo.
Example:
# Enter the directory and list contents
cd gcp_py_samples
ls
If needed, you can locate a cloned repo with:
find /c/gcp_sandbox/ -type d -name gcp_py_samples -print
Tip: It is a good idea to complete this section before moving on. For each session, activate your virtual environment before using it, or create a launch batch file to automate this. If it is already activated and you activate it again, it will not drain additional resources.
Now that you are in the cloned repository folder, instantiate your virtual environment (venv). This should take approximately 15 seconds.
Example:
# Create your venv
python -m venv venv

# *Reminder:*
# The first "venv" is the Python module that creates virtual environments.
# The second "venv" is the directory it creates to house your isolated environment.
Tip: Naming your virtual environment
venvsimplifies detection by tools like PyCharm. However, you may name it something else if needed (e.g.,gcp_py_samples_venv).
Activate the newly created virtual environment.
Example:
# For Linux or macOS syntax:
source venv/Scripts/activate

# For Windows CMD:
venv\Scripts\activate
Benefit: After activation, any
pip installcommands will install packages inside this virtual environment. This allows easy environment control without affecting system-wide Python installations.
2. Install GCP Library by Installing the GCP pip Package
Install the preliminary GCP package and dependencies.
Example:
# Install GCP dependencies
pip install --no-deps -e .
If the command does not work, explicitly call Artifactory:
Example:
pip install --no-deps -e . --extra-index-url https://<StandardID>:*****@artifacts.horizon.bankofoz.com/artifactory/api/pypi/virtual-pypi/simple
Install the specific libraries for this repository.
In this repository, you are installing:
gcp,matplotlib, andradonfrom therequirements.txtfilepytestfrom thebuild_requirements.txtfile
Example:
# Install main libraries
pip install -r requirements.txt

# Install testing framework
pip install -r build_requirements.txt
Reference: For background on how
venvenvironments are created and updated, see the official Python venv tutorial.
If the above installations were successful, you are ready to proceed to the next section: Write Workflow.
However, it is important to deactivate your virtual environment before switching to another project that uses a different repository.
You can deactivate your environment by running:
Example:
# Exit the current venv
deactivate
Troubleshooting: If you were unsuccessful in this section, confirm that your
pip.ini(orpip.cfg) file is correct, and that your path points properly to/c/gcp_sandbox/modelproject01/.
Know When to Deactivate Your Virtual Python Environment
When you need to switch to another virtual environment (for a different project)
When you complete a project
Before running system-wide Python commands (e.g., installing a global package)
When opening a new shell session (because venvs do not persist across terminal sessions)
3. Write Workflow
Now it is time to write the first GCP workflow (hello_world), comprising two nodes:
name: This element is defined as an axis of type
Str. Axis values (coordinates) can be specified by a user during execution (at runtime). They can also be set by other nodes (detailed in a forthcoming walkthrough TK).message: This element is defined as a function (Fn). GCP function nodes accept any Python function (e.g.,
say_hello) and a mapping of outputs of another node to this function’s inputs. In this graph, thesay_hellofunction’s input parameteruser_nameis being set to the value of thenamenode.
To prepare your first GCP Python script:
Launch VS Code or any text editor that can be used for coding or scripting.
From the GCP module, import the required functions or classes:
from gcp_kernel.api.task_definition import gcp_task
from gcp_kernel.api.workflow_definition import Workflow, Axis, Fn
Using f-string syntax, which concisely and efficiently manipulates strings in Python, create the greeting.
It is important to use@gcp_task, a decorator, to define the greeting function:
@gcp_task
def say_hello(user_name: str) -> str:
    return f'Hello {user_name}'
Important: All functions called directly from a GCP workflow must use either the
@gcp_taskor@gcp_sparkdecorators. These decorators modify or extend the behavior of functions without changing their actual code.
Construct your GCP workflow.
A GCP workflow is a set of GCP nodes chained together:
greeter = Workflow(
    workflow_name="Greeter",
    description="Workflow that creates a greeting",
    graph={
        'name': Axis(str),
        'message': Fn(say_hello, {'user_name': 'name'})
    }
)
Python concept: A graph is a Python data structure that consists of nodes and edges. The edges connect nodes and can be either bidirectional or directed (where one node specifically depends on another).
Save your file:
../gcp_py_samples/hello_world_01.py
Copy your new file to the
srcfolder:
cp hello_world_01.py /c/gcp_sandbox/modelproject01/gcp_py_samples/src/gcp_py_samples/workflows
Note: It is best practice to copy the file instead of moving it. This way, your copy remains easily discoverable by any GCP program or script looking for your workflow.
Now that your file hello_world_01.py is saved into both your gcp_py_samples and src folders, you are ready to test it for errors and run it in the next section.
A brief explanation of some key elements in your workflow will also be reviewed during testing, using pytest.ini.
4. Test Workflow
You will run the hello_world_01.py workflow by sending it values and testing parameters using a file that you will edit called test_hello_world_01.py.
Normally, before releasing a GCP workflow, model developers test it with pytest.ini.
This not only runs your workflow, but also identifies dozens of potential problems with your code, data binding, or delays.
Diagram:
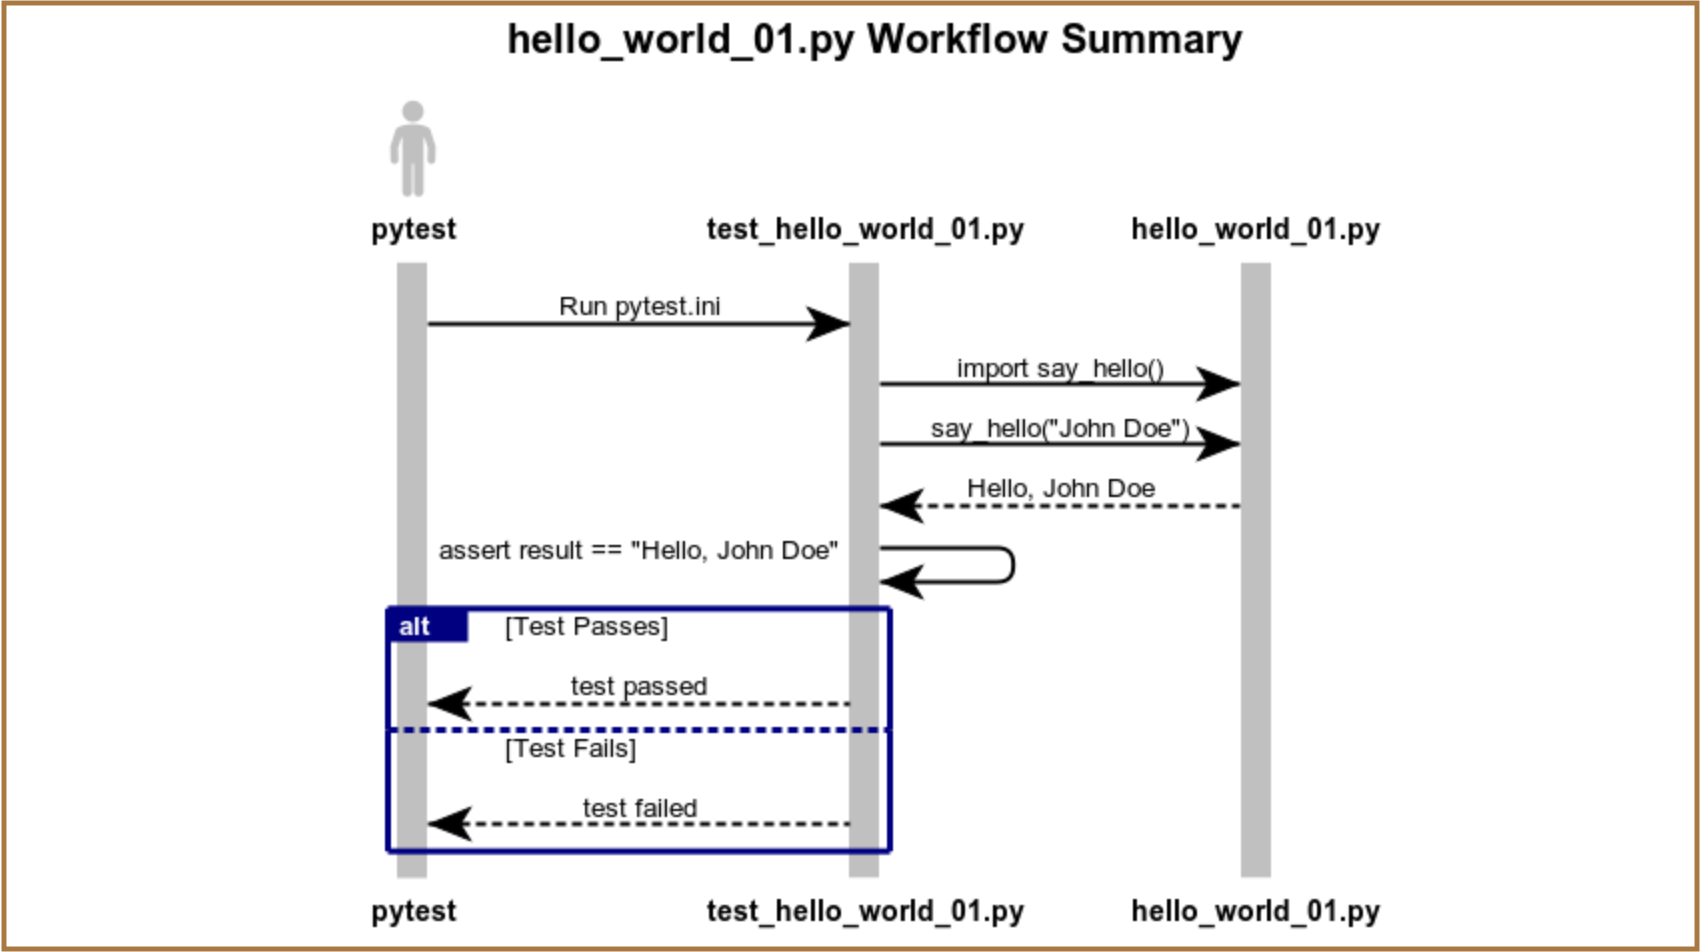
hello_world_01.py ladder diagram summarizes how the files work together when you execute pytest.ini at runtime.
To proceed:
In the tests/integration folder, make a copy of
test_demo.pyand rename it totest_hello_world_01.py.Open
test_hello_world_01.pyin VS Code or a text editor.Specify the correct file and workflow name (
greeter) by editing line 2:
# Change:
# from gcp_py_samples.workflows.demo import demo_wf

# Update to:
from gcp_py_samples.workflows.hello_world_01 import greeter
Update the node name and coordinates by editing lines 6 and 7:
# Change:
# node = 'FN2'
# coords = ('AX1', 100)

# Update to:
node = 'message'
coords = {'name': 'John Doe'}
Update the
ExecRequestsconstructor with the correctworkflow_fqnandversionby editing lines 10 and 11:
# Change:
# workflow_fqn=demo_wf.fqn,
# version=demo_wf.version,

# Update to:
workflow_fqn=greeter.fqn,
version=greeter.version,
Specify the function that your test will be evaluating by updating the
assertstatement:
# Change:
# assert results.get('FN2') == '200 Hello'

# Update to:
assert results.get('message') == '200 Hello'
Note:
assertis how tests pass or fail inpytest:
If the assertion fails,
pytestmarks the test as failed and shows a diff between expected and actual values.If the assertion passes, the test continues or ends successfully (see Step 9 for more).
After completing the edits, save the document to the integration folder:
/c/gcp_sandbox/modelproject01/gcp_py_samples/tests/integration/test_hello_world_01.py
Run the file you just saved and review the response to familiarize yourself with the feedback provided by the tests.
Example:
C:\dev\gcp_py_samples\tests\integration> pytest test_hello_world_01.py
To complete this exercise, change your
assertargument to match the correct expected value and rerunpytest.
Example:
# Change:
# assert results.get('message') == '200 Hello'

# Update to:
assert results.get('message') == 'Hello John Doe'
In the next section, you will run a similar workflow called hello_world_02.py. These instructions will be more concise and will introduce new nodes to add two numbers.
Understanding the GCP Workflow
In this section you will:
1. How to Create a Workflow Adding Two Numbers
In this section, your objective is to create a GCP workflow that takes two input values (x and y) and returns their sum.
Diagram:
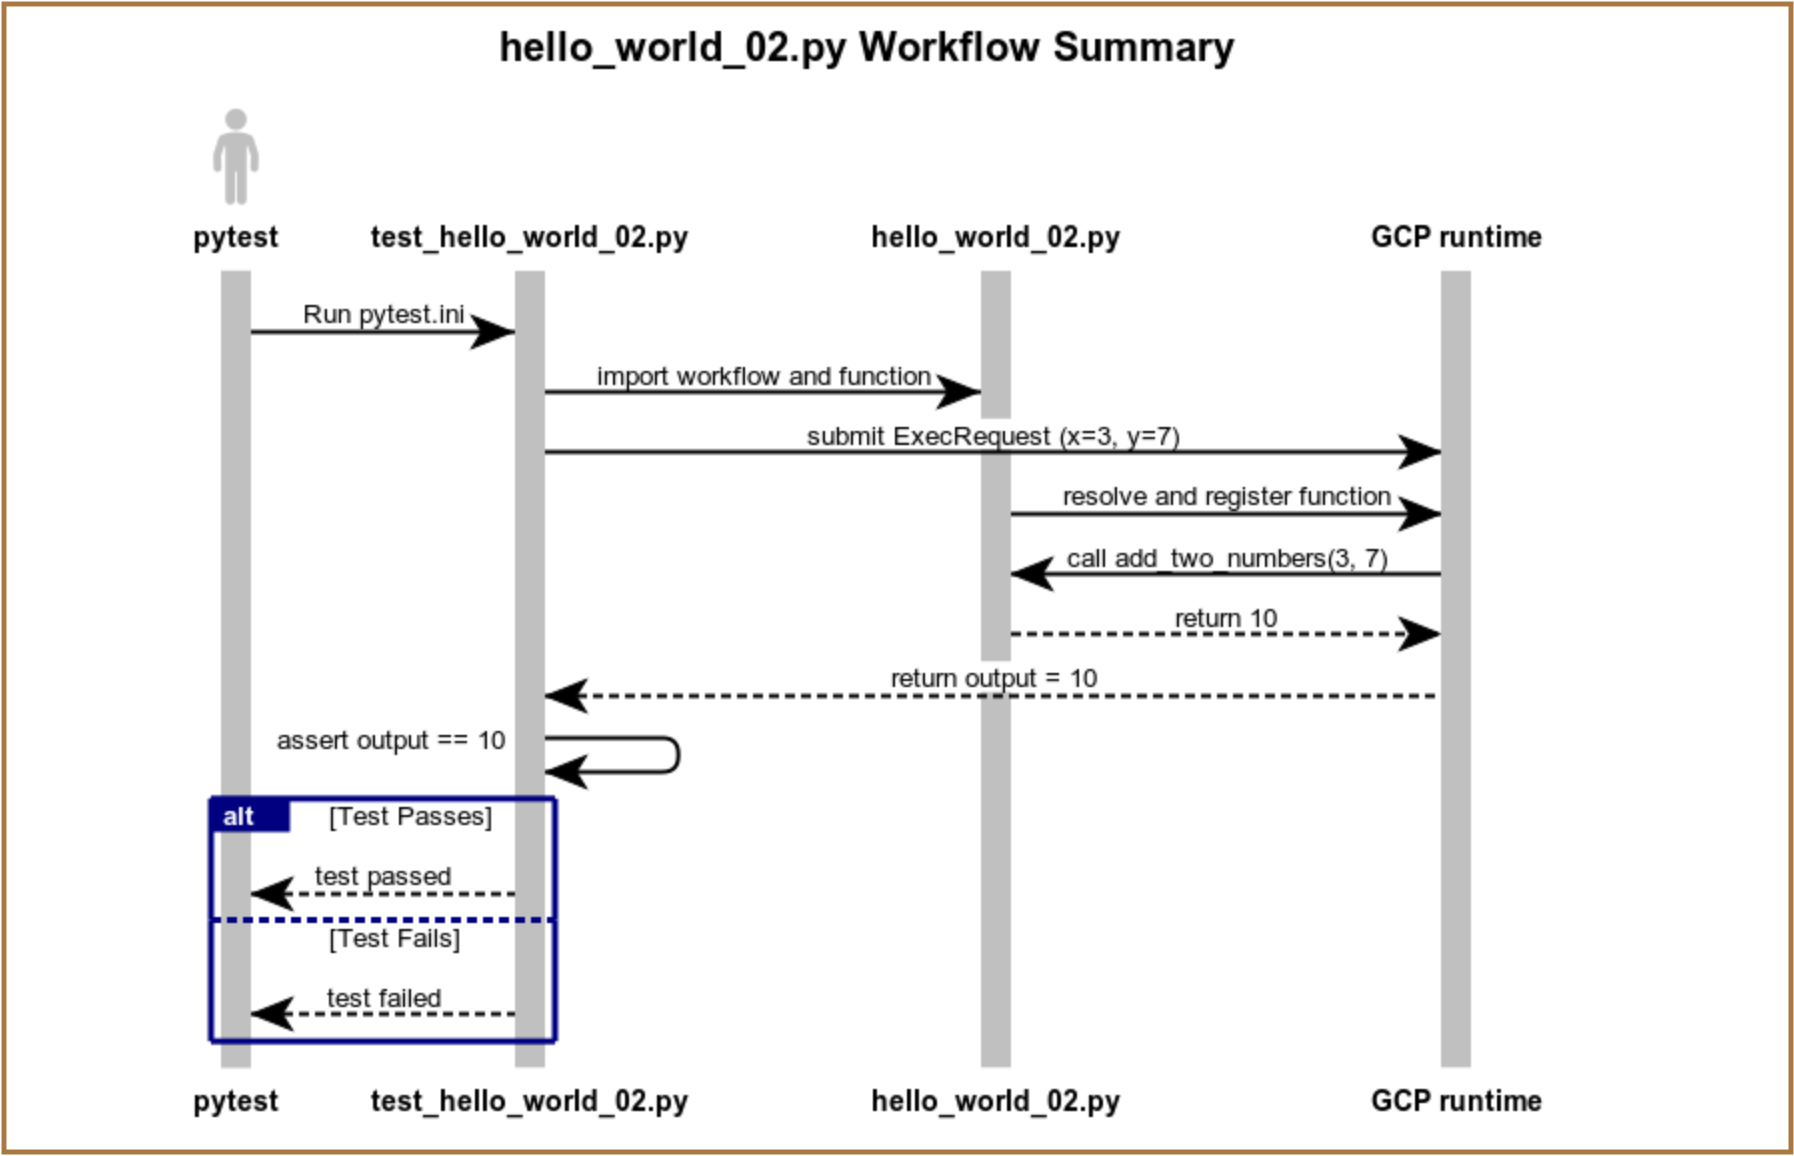
The hello_world_02.py Workflow Summary ladder diagram above reviews how the files work together when you execute pytest.ini at runtime.
Refer back to this diagram after creating a similar file, hello_world_03.py, which introduces the GCP @gcp_task decorator and the tasks folder.
Key Workflow Configuration Parameters
Below is a list of the main parameters used in this exercise, which you will frequently use when designing your own workflows:
Axis: Represents an input node.Fn: Represents a computation node that runs a Python function.function_path=add_two_numbers: Directly references the local Python function.
inputs={'x': 'input1', 'y': 'input2'}: Binds input values to function arguments.output: Holds the result ofadd_two_numbers(x, y).
Steps:
Open
hello_world_01.py, remove all code, add a comment summarizing the new function, and save the file ashello_world_02.py.
Example:
# GCP Workflow with function to add_two_numbers
Import the core GCP classes and utilities needed to define the workflow.
Example:
from gcp_kernel.api.task_definition import gcp_task
from gcp_kernel.api.workflow_definition import Axis, Fn, Workflow, WorkflowConf, ExecutionPlatform
Define a local function that adds two numbers.
Example:
# This is the actual Python logic in your GCP workflow
def add_two_numbers(x, y):
    return x + y
Hint: You can later move this functionality into a separate task file. We will cover this in the next section: Learn How to Utilize GCP Tasks.
Construct the
hello_world_02workflow using theWorkflowclass.
Example:
hello_world = Workflow(
    workflow_name="Hello World 02",
    description="A workflow that sums its inputs",
    configurations=WorkflowConf(platform=ExecutionPlatform.PURE_PYTHON, is_deployable=False),
    graph={
        'input1': Axis(data_type=int),
        'input2': Axis(data_type=int),
        'output': Fn(function_path=add_two_numbers, inputs={'x': 'input1', 'y': 'input2'})
    }
)
Save the file.
Then copy it into the/src/workflows/directory.
Example:
cp hello_world_02.py /c/gcp_sandbox/modelproject01/gcp_py_samples/src/gcp_py_samples/workflows/hello_world_02.py
Tip: If you do not save the file into the workflows directory, you will not be able to import it correctly in your tests.
Prepare a new test file by copying and updating
test_hello_world_01.py, and saving it astest_hello_world_02.py.
Example:
# test_hello_world_02 function to add_two_numbers, x=3, y=7
# Save to:
# /c/gcp_sandbox/modelproject01/gcp_py_samples/tests/integration/

from gcp_kernel.api.execution import ExecRequests
from gcp_py_samples.workflows.hello_world_02 import hello_world

def test_addition_workflow(python_executor):
    node = 'output'
    coords = {'input1': 3, 'input2': 7}

    exec_request = ExecRequests(
        workflow_fqn=hello_world.fqn,
        version=hello_world.version,
        nodes_and_coords={node: coords}
    )

    results, _ = python_executor.execute_requests(exec_request)
    assert results.get('output') == 10
Run the file you just saved and review the response.
Example:
/c/gcp_sandbox/modelproject01/gcp_py_samples/tests/integration> pytest test_hello_world_02.py
2. Experiment with assert for Better Test Scripting
Testing, as you may have noticed from the output reports, is multi-layered and comprehensive.
You can take advantage of this by modifying test scripts to create multiple test cases that run each time you call a test file. Simply use a parameterized approach.
In a Nutshell: Copy everything after the import statements, paste it at the bottom of the file, give the function a unique name, and modify your values.
The example below shows how you can easily run two tests from a single file.
Example:
# File: ../gcp_py_samples/tests/integration/test_hello_world_02_two_asserts.py

from gcp_kernel.api.execution import ExecRequests
from gcp_py_samples.workflows.hello_world_02 import hello_world

def test_addition_workflow(python_executor):
    node = 'output'
    coords = {'input1': 3, 'input2': 7}

    exec_request = ExecRequests(
        workflow_fqn=hello_world.fqn,
        version=hello_world.version,
        nodes_and_coords={node: coords}
    )

    results, _, _ = python_executor.execute_requests(exec_request)
    assert results.get('output') == 10

def test_addition_workflow02(python_executor):
    node = 'output'
    coords = {'input1': 4, 'input2': 8}

    exec_request = ExecRequests(
        workflow_fqn=hello_world.fqn,
        version=hello_world.version,
        nodes_and_coords={node: coords}
    )

    results, _, _ = python_executor.execute_requests(exec_request)
    assert results.get('output') == 13
3. Concise Summary of First Two Workflows
This section provides a quick summary of the GCP elements involved in say_hello() and add_two_numbers(x, y).
Since each exercise included some setup tasks that you only need to do once, this serves as a starting point for quick reviews — focusing purely on GCP elements and key Python concepts such as decorators.
In say_hello(), you ran a basic workflow with two files:
hello_world_01.pydefined a function (say_hello(name))test_hello_world_01.pytested this function
The test simulated a greeting output and validated the result:
☑ If the result matches expectations → the test passes
✗ If it does not match → the test fails
In add_two_numbers(x, y), you built a GCP workflow that adds two numbers:
hello_world_02.pydefined the workflow inline, using:Axisfor input nodesFnfor the function nodeThe
add_two_numbers(x: int, y: int)function, written directly in the file
test_hello_world_02.pysubmitted an execution request with inputs and asserted the result
In the test output (echo):
☑ If the sum matches → the test passes
✗ If the result is incorrect or the type hint is missing → the test fails
4. Learn How to Utilize GCP Tasks
The objective of this section is to offload core business logic to a third file, stored in the
../gcp_py_samples/src/gcp_py_samples/tasks/ folder.
You will then access the function from workflows using the @gcp_task decorator.
Copy
hello_world_02.pyto a new file
Create a copy of the script that added two numbers into the workflows folder.
Example:
cp hello_world_02.py /c/gcp_sandbox/modelproject01/gcp_py_samples/src/gcp_py_samples/workflows/hello_world_03.py
Remove the function that will be placed into a new file
Delete or comment out the function, as well as the import code that is no longer needed.
In the next step, this logic will be moved to a separate Python file.
Example:
# GCP Workflow with function to add_two_numbers

# Commented out import (1 line):
# from gcp_kernel.api.task_definition import gcp_task

from gcp_kernel.api.workflow_definition import Axis, Fn, Workflow, WorkflowConf, ExecutionPlatform

# ...

# Commented out core logic (3 lines):
# @gcp_task
# def add_two_numbers(x: int, y: int) -> int:
#     return x + y

hello_world = Workflow(
    # ...
)
Create the task file
Move the removed function into a new file called add_two_numbers_03.py, and save it in the tasks folder:
/c/gcp_sandbox/modelproject01/gcp_py_samples/src/gcp_py_samples/tasks/
Contents of the new task file:
from gcp_kernel.api.task_definition import gcp_task

@gcp_task
def add_two_numbers(x: int, y: int) -> int:
    """Task that returns a sum of its inputs"""
    return x + y
Import the task into your workflow
In the import section of hello_world_03.py, add your new task import.
Example:
# Necessary import when moving the function to the tasks folder

from gcp_py_samples.tasks.add_two_numbers_03 import add_two_numbers
You can now access your stand-alone task from any workflow.
Create a new test file (optional)
Although you could reuse test_hello_world_02.py, it is good practice to create a discrete test file.
Example:
cp test_hello_world_02.py /c/gcp_sandbox/modelproject01/gcp_py_samples/src/gcp_py_samples/tests/test_hello_world_03.py
Run the test
Modify the new or existing test script as needed and run it.
Example:
pytest test_hello_world_03.py
5. Summary: Workflows and Tasks
In the previous section, your objective was to separate a GCP workflow from the task of adding two input values (x and y).
Three .py files are involved, summarized in the ladder diagram below:
Diagram:
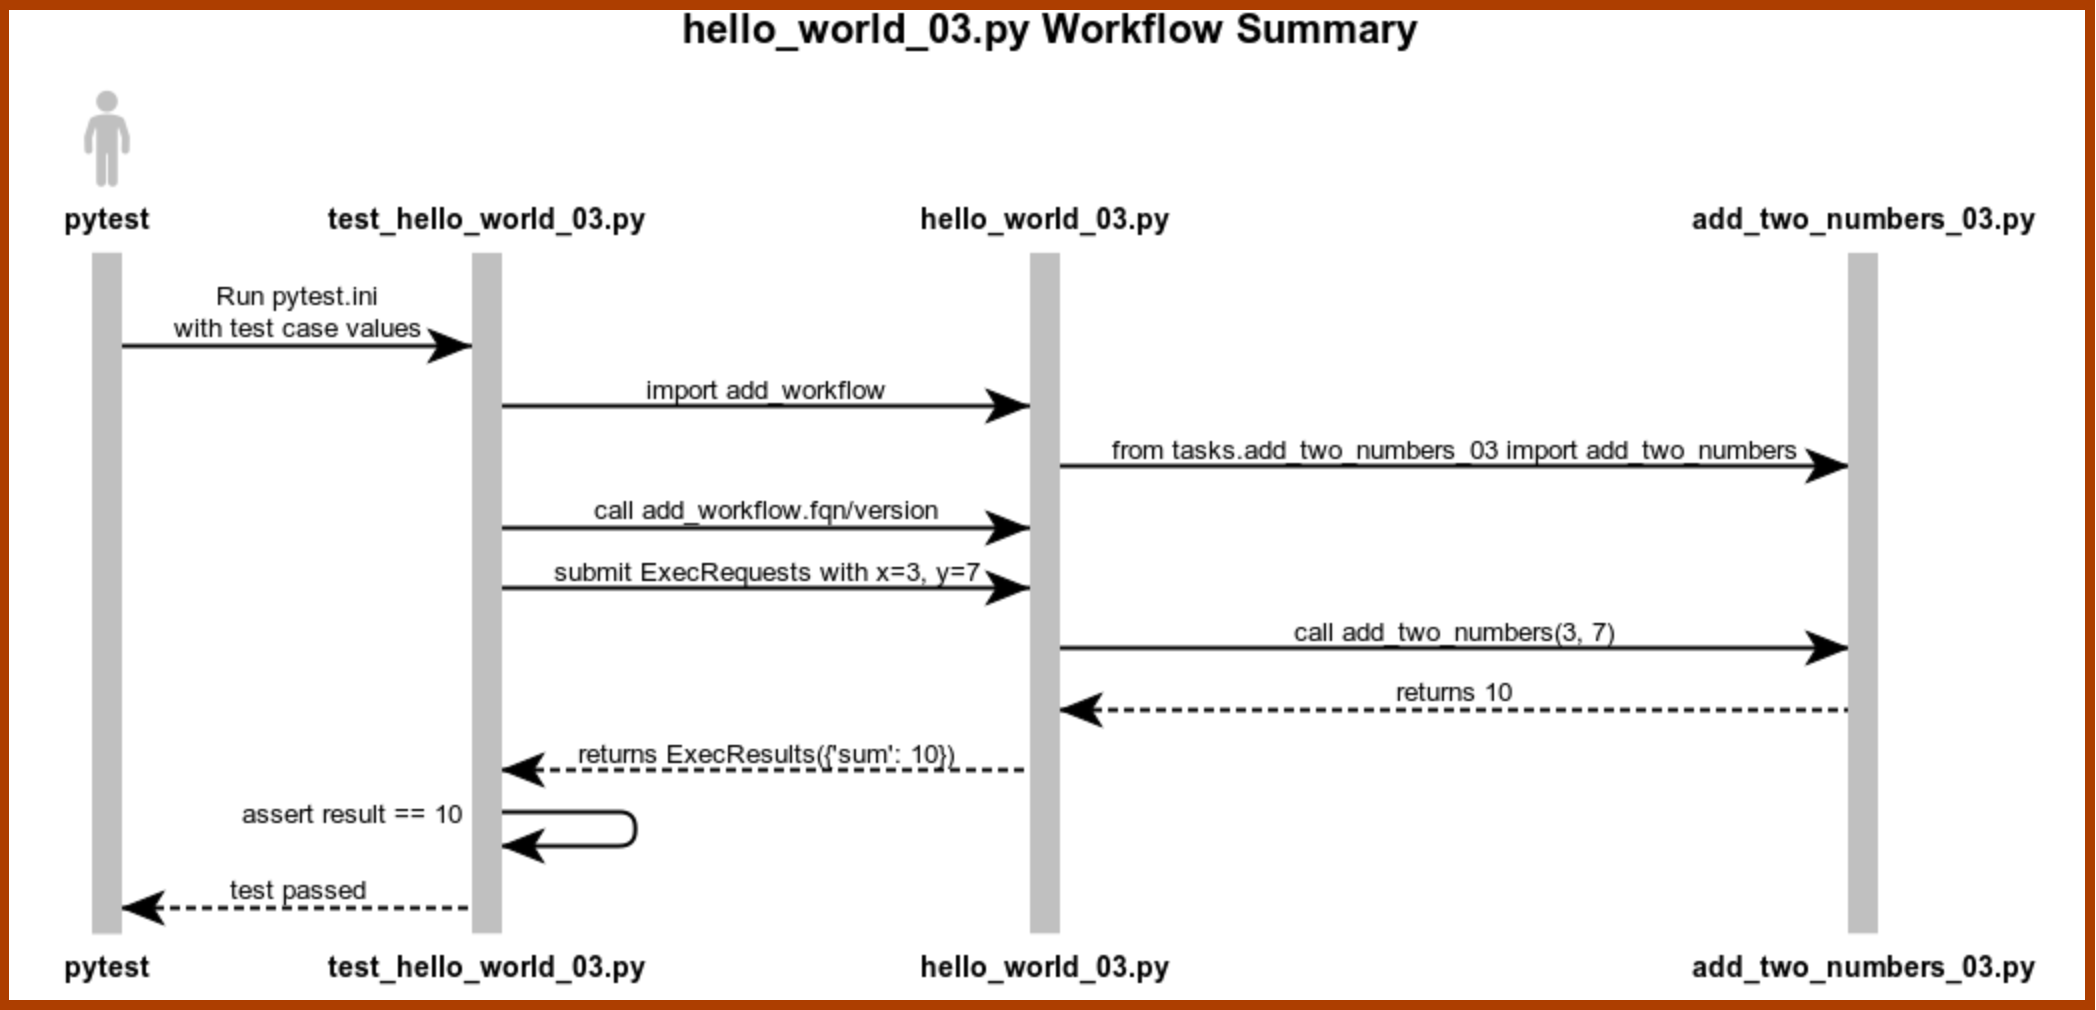
The hello_world_03.py Workflow Summary diagram reviews how pytest.ini and the three files work together when you execute the test at runtime.
The GCP decorator @gcp_task is the most important element in this structure.
Remember also to save your task in the correct tasks folder.
Now that you have completed an overview of workflows and tasks, explore and browse the sample files available in these directories to experiment further:
C:/dev/gcp_py_samples/src/gcp_py_samples/workflows/C:/dev/gcp_py_samples/src/gcp_py_samples/tasks/
GCP Workflow Components
This section details the main workflow components, configuration parameters, and principles.
It defines how workflows are constructed, how nodes operate, and provides examples for each node type.
Workflow
A Workflow orchestrates a series of interconnected nodes — inputs, computations, and functions — into a graph structure.
It defines the sequence and relationships between tasks that run within GCP.
Example:
# Created in Python using:
from gcp_kernel.api.workflow_definition import Workflow
Additional Information:
A GCPWorkflowis conceptually similar to a DAG (Directed Acyclic Graph) in frameworks such as Airflow, Prefect, or Luigi.
Node
A node represents an individual component inside a workflow.
Each node can be a data input, a computation, a constant, a function call, or other operation.
Current GCP node types:
Each type is described below.
Axis
An Axis represents a tunable or input value passed at runtime.
It accepts values either from the user or from other nodes.
Example:
'name': Axis(str)
Note:
Axisbehaves like a function parameter or loop variable in Python.
Const
A Const node holds a static value defined directly in the graph.
It is used for constants that do not require dynamic input.
Example:
'const': Const(List[int], [1, 2, 3])
Note:
Python does not enforce constant variables; values are reassigned freely.
Fn
An Fn node executes a Python function decorated with @gcp_task or @gcp_spark_task.
It maps inputs from other nodes to the function’s parameters.
Example:
'message': Fn(say_hello, {'user_name': 'name'})
Note:
Fnis equivalent to decorated function calls in Python frameworks.
Switch
A Switch node implements conditional branching, similar to Python’s if-elif-else or match-case logic.
Example:
"result": Switch("x", {1: "frac#denominator", 2: "frac#numerator"}, "frac#numerator")
Ref
A Ref node references another node’s output or a workflow’s result.
It allows reuse of values computed elsewhere.
Example:
"prediction": Ref('gcp_py_samples.workflows.demo2b.calbr_wf/model_output',
                  {'portfolio_name': 'portfolio_name', 'as_of': 'as_of'})
Note:
In Python, references are usually implicit through variable assignment.
UserInput
A UserInput node explicitly requires manual input at runtime before dependent nodes can execute.
Example:
python_executor.add_user_input_value(...)
Note:
This is conceptually similar to usinginput()in Python.
SQL
An SQL node executes a database query inside the GCP environment against a predefined source.
Example:
def sql_user(table: PORTFOLIO_SDF) -> int:
    return table.shape[0]
Note:
In Python, similar operations are performed with libraries likesqlite3,pandas.read_sql, or SQLAlchemy.
ExtSQL
An ExtSQL node executes queries against external (non-Spark, non-Hive) databases.
Example:
'sql_result': ExtSQL(
    sql=sql_string,
    sources=["CLIMATE", "WHOLESALE"],
    output_type=PORTFOLIO_SDF,
    query_parameters={"run_id": "run_id"}
)
Note:
Python equivalents include external connectors such aspsycopg2orpyodbc.
AggZip
Agg nodes perform aggregation over multiple node outputs.
Zip nodes combine coordinate values element-wise across nodes.
Aggregation Example:
'ag': Agg('fn', {'a': 'const'})
Zip Example:
'zip_nd': Zip(invoked_node='fn_nd2', sourced_axis_entries={'axis_int': 'cnst_nd2', 'axis_str': 'cnst_nd'})
Note:
Python uses functions likezip(),sum(), andreduce()for similar purposes.
Summary: GCP Nodes Compared to Python
GCP Concept |
Used in GCP |
Native in Python |
Equivalent Concept in Python |
|---|---|---|---|
☑︎ |
✗ |
DAGs, pipelines (Airflow, Prefect) |
|
☑︎ |
☑︎ |
Functions, variables |
|
☑︎ |
☑︎ |
Function parameters, input variables |
|
☑︎ |
✗ |
Regular variables |
|
☑︎ |
☑︎ (decorators) |
Decorated functions |
|
☑︎ |
☑︎ |
if-elif-else, match-case |
|
☑︎ |
☑︎ (implicit) |
Passing variables between functions |
|
☑︎ |
☑︎ (different) |
input() calls |
|
☑︎ |
☑︎ (via libraries) |
Raw SQL queries (sqlite3, pandas) |
|
☑︎ |
☑︎ (via connectors) |
External DB connectors (psycopg2, pyodbc) |
|
☑︎ |
☑︎ (Zip only) |
zip(), sum(), reduce(), Pandas groupby().agg() |
Running in a Lane
Overview of GCP SDLC process
How to push workflows to a lane and execute from the UI
Recommended starting point:
Set Up SSH Keys for New GCP Servers
System Tasks
Documentation for system tasks
Writing unit tests and using the GCP internal test harness
Note:
"=="in comments is intentional — it is used for extended command testing across interpreters.
Other GCP Concepts
GCP Retrieves and Persists Data Automatically
All data is indexed by axes.
Axes are attached to outputs and stored persistently.
(Additional details forthcoming.)
Best Practices
Configure result persistence early in development.
Design modular workflows to support “what-if” analysis scenarios.
(Additional best practices forthcoming.)
Document Approval and Acceptance History
Doc Version |
Go Live Date |
Approved by |
Notes and Comments |
|---|---|---|---|
v.0.0.1 |
2025-03-01 |
Initial draft, will later split into subdocuments |
|
v.1.0.0 |
2025-04-14 |
Major revisions by Adriano Sverko, milestone release |
|
v.1.1.0 |
tk |
tk |
tk |
v.2.0.0 |
tk |
tk |
tk |